
Digital photography plays a major role across different platforms. The need for digital photography is rigorously increasing in every part of the e-commerce sector. But, providing perfection requires editing and retouching photos. This immensely improves business reputation and visibility.
So, in this article, we are discussing some digital photo retouching tools to convey the key information that would assist in your photo editing. Check out!
Table of Content
- What Is Digital Photo Retouching?
- What Is the Difference Between Editing and Retouching?
- History of Photo Retouching
- What Does a Photo Retoucher Do?
- Different Types of Photo Retouching Works
- What Are the Most Used Photo Retouching Tools and Techniques?
- What Are the Most Retouching Photos Types?
- FAQs
- Perfection
What Is Digital Photo Retouching?
Digital photo retouching is the method of processing, editing, and making adjustments in photos using reliable editing software to improve the overall appearance.
Retouching removes any flaws and defects from the image. Though photo retouching is used in every industry, however usually is seen in fashion publications.
But how challenging is the retouching process?
Photo retouching works range from basic to more intense editing, and the process can be challenging if you aren’t adept in photo retouching work. You can find several free versions of editing software to work on your retouching.
It takes a lot of post-processing work to complete the retouching, which ultimately leads to relying on various retouching services for consistent and accurate results.
What Is the Difference Between Editing and Retouching?
These days photography is raising more interest among enthusiasts and hobbyists. So, the term editing and retouching are used frequently among new photographers, which is not the correct way to use these terms. Editing and retouching have distinct meanings that differ from each other.
| Editing | Retouching |
| Editing is the primary adjustment of the photos where images are cropped, correcting exposure settings or color temperature. | Retouching is the removal of all the imperfections, such as blemishes, using airbrushes to remove certain elements. |
| Editing is the fast process of photo editing | Retouching is the detailed manner of editing and correcting all imperfections |
| Editing is narrowing down your collection of images to the best collection | Retouching sorts the collection as well but it requires more time and editing skills to fulfill |
| Editing uses fewer resources of the editing software | Retouching requires more resources and many layers of editing to perfect photos |
| Editing uses basic tools to edit the photos such as cropping, color temperature, lighting or exposure, blending photos and more | Retouching uses basic and advanced editing features, such as lighting, airbrushing, sharpening, pen tool, healing brush tool, and more |
These are some of the highlights of editing and retouching photos comparison. The editing or retouching solely depends on the photos you get in hand, the client you are working with, and the instructions.
Read Also: What Are the Basics of Photo Editing? Basic Things to Follow While Edit Photos
History of Photo Retouching
According to a statistic, Adobe Photoshop is the most-used, and around one-third of customers use Adobe products. ‘Photoshop’ is now synonymous with ‘editing,’ used in everyday conversation. Nowadays, people are using ‘Photoshop instead of ‘Photo editing.’
But how was the scenario before Photoshop came, and what was the history of photo retouching?
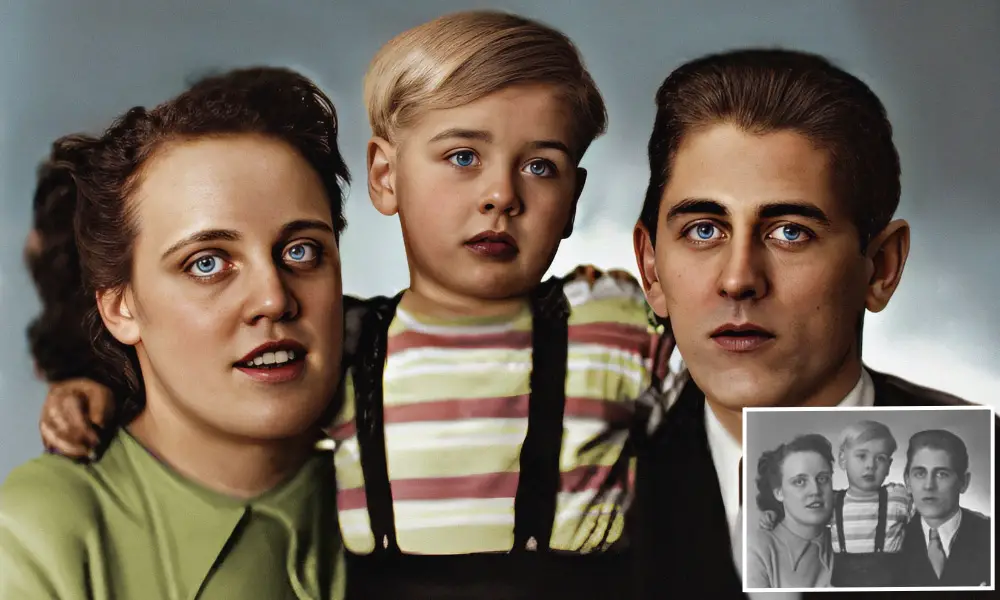
- Beginning of Image processing: During the mid-1800s, multiple copies of any photo could be produced through a process called Calotype, which William Henry Fox first introduced. The earliest photo retouching works used to be documented in this process.
- Improved Image Processing: Coming out of darkroom editing in the 20th century, editors and photographers compiled different sets of photo retouching techniques. In 1910, some commercial studios started to offer editing services, and people used to edit a portion of their images.
- Darkroom Tweak: In 1920, Alexander Rodchenko first established and collected different cutting of photos to make the first collages. At that time, the darkroom trickery and the layering of negatives provided black-and-white edited photos.
- First Processing Software: Before the arrival of the digital cameras, Barneyscanner could show digital 35mm copies on the computer screen. The scanner featured a software package called Barneyscan XP, which was used as image-processing software known as today’s Photoshop as well.
- Adobe Photoshop Released: In 1987, Adobe Photoshop was released, and photo editing became available and accessible to individuals. The software was available while allowing users to manipulate their Images.
Read Also: Best Ai Photo Editor List You May Use As Online, Apps & Software
What Does a Photo Retoucher Do?
You might be wondering what types of photo retouching works a digital retoucher does. Digital retoucher works on both basic and advanced editing within the time limit. They work in the digital studio, photography studio, printing facility, or design studio.
A digital retoucher has several responsibilities. Find out!
- A digital retoucher uses software to alter the elements of digital photos or images
- A retoucher reviews photos to regulate which one requires retouching
- They remove imperfections, blemishes, and skin tones and adjust exposure or color temperature
- Their responsibility is to improve the complete presentation of the images
They mainly work in the design studio, photography studio, or printing facility.
Different Types of Photo Retouching Works
An experienced retoucher makes corrections to the image and brings out the emotions from the photo. But before retouching images with Photoshop, retouchers need to know your requirement for editing photos. There are several types of photo retouching to accomplish the editing task. Find out these in the following.
Basic Retouching
Basic retouching is easy, and it only includes simple changes. As basic retouching changes only a few elements, it takes a short amount of time. Some basic retouching services include blemish scar removal, removing stray hair, color correction, and more. Let’s find out the basic retouching in brief.
Blemish, Scar, and Pimple Removal
Removing blemishes, scars, and pimples require using the clone stamp tool. It is used to remove imperfections on your skin. The processing shouldn’t be noticeable if the retouch work is done properly. It gives the subject a fresh and attractive look while increasing color accuracy.
Pro-Tip: Set the spacing (Brush Tip Shape) to 1% to make the edges smooth in the full-size brush panel.
Stray Hair Removal
When you photograph, flyaway hair or awkward facial hair may cover your face. It distracts you from your all-over look. So, if you need to edit out the stray hair or flyaway hairs from the images, you need to use the spot healing brush tool.
Pro-Tip: Use the clone stamp tool to remove flyaway hair.
Skin Smoothening
If you have blemishes or acne on your face that creates imperfect photos, you can quickly do the smoothening image task. Photoshop’s spot-healing brush tool is perfect for removing imperfections in your photo.
Pro-Tip: It is the best practice to use the soft-edge brush tool to paint over the face.
Face/body Liquefying.
Want to change your facial expression or exaggerate a bit? Whether you want to change your facial or body expression, the face-aware liquefy option in Photoshop editing tools helps you elevate your expression. The liquefy option helps you adjust or enhance your photos.
Pro-Tip: For more than one face in a photo, go to select and choose one of the faces to adjust.
Color/tone Correction
You can make corrections to the colors and tones according to your creativity. You can choose either color black, white, or sepia images to color your photos with a modern aesthetic look. Once you color-correct the overall look of your photo, the color accuracy of the photograph will increase.
Pro-Tip: While editing for color correction, adjust the highlights and mid-tones to get better exposure.
Lines/wrinkles Reduction
When you photoshoot for a fashion magazine, you don’t want your face to have wrinkles and lines that make the photo worst. So, in this case, you need to edit your photo to reduce the wrinkles and make the person look younger as opposed to wrinkles or lines on your face.
Pro-Tip: While using the healing brush tool to remove wrinkles, make sure the face and the looks come out naturally.
Teeth Whitening
When bleaching your teeth might be expensive for a photo shoot, some editing will relieve you from whitening your teeth. Most of us want to see a smile on a photoshoot, and it makes us look attractive. Photoshop allows you to edit and whiten teeth in many ways. Choose your way to edit your teeth.
Pro-Tip: First of all, determine if your teeth are really healthy, and on editing software in the adjustment layer, lower the saturation to get the best result.
Remove Unwanted Objects from Photos
Suppose you want to remove unwanted objects such as skin blemishes, wrinkles, and skin imperfections, fix backgrounds, and lots of other fixes. In that case, Photoshop includes removing unwanted objects through its special set of tools. Choose your tools to enhance yours.
Advanced Retouching
Advanced retouching is time-consuming and takes a lot more time than basic editing. However, advanced retouching includes more advanced, accurate, and comprehensive options than basic editing. Find out some of the advanced retouching options in the following.
Eyes Enhancement
What does it take to make a great portrait? The lighting, color, or wardrobe; these things help create a more influential image, but the best portraits are crafted mostly by your eyes. The major thing is learning a professional approach to brighten, color, or enhance details for eyes is mandatory.
Pro-Tip: Learn frequency separation, dodge and burn effect, and sharpening to make your eyes unique and detailed.
Dodge and Burn Effect
Dodge and burn are the lightening or darkening of the specific areas of your photo. You can enhance, highlight and add shadows to the dimension and draw more attention to your eyes. Use the Photoshop technique to apply the effect more effectively.
Pro-Tip: Set the new layer to a luminosity blend to prevent oversaturation during editing.
Skin Toning
Whether you’re taking portraits or fashion shoots for the candid shot, you may want to check for photos’ inaccuracies. You can find the skin tone gets a little off while the photo captured. Easily do your skin tone enhancements with quick color functions in Photoshop for the best possible lighting.
Pro-Tip: Use the tonal adjustments in the Camera Raw filter for further editing.
Adding Digital Make-Up
Digital makeup is the compositing technique used to change the subject’s overall look. This technique is such an effective part of Photoshop that it changes your overall look in a minute. You just need to use the correct tool, such as a soft-edged brush tool or different effects for editing.
Pro-Tip: While saving editing work in Photoshop, use the PSD format to save, and this lets you edit the individual layers later.
Airbrushed Effect
Airbrushing technique is solely dependent on the airbrush tool. This tool allows you to edit the light strokes, little details, and blurry edges. So, the result with this tool is impressive while reaching photographic quality and wonderfully portray of Photoshop.
Pro-Tip: Set the opacity of the brush to 20 to 30%, and this makes the Image more colorful.
Adding Contrast and Sharpening
Sharpening and contrast is a master process to edit your images. While contrast makes your Image brighter, sharpening provides clarity for your images. There are lots of tools to edit, contrast, and sharpen your images in Photoshop.
Pro-Tip: Reduce the noise of the Image, so the Image will be sharp and accurate.
Wrinkles/lines/spot Reduction
When you photoshoot for a fashion magazine, you don’t want your face to have wrinkles and lines that make the photo worst. So, in this case, you need to edit your photo to reduce the wrinkles and make the person look younger instead of wrinkles or lines on your face.
Pro-Tip: While using the healing brush tool to remove wrinkles, make sure the face and looks appear natural.
Background Retouching
Background retouching removes the blemishes in the background with the help of retouching. Background retouching requires advanced retouching ability to use and place the editing accurately. Find out the advanced retouching options in the following.
Clipping Path
The clipping path is definitely one of the most important options for photo editing. This allows you to remove or cut out the item from the background of an image. This editing essential is useful when you have multiple colors in the background, and you want to edit against a complex colored background.
Pro-Tip: While editing, extracting the shadows from the original image enables you to make the final product look realistic.
Image Masking
The image masking process is one of the most used features of Photoshop. Image masking allows you to paint on a layer mask while you can hide or reveal parts of an image. It is essential to know the image masking for different kinds of adjustments or transformations.
Pro-Tip: For smooth edge transformation, pick a soft brush.
Background Changing
If you have a background that looks imperfect and needs to be sorted out, use Photoshop’s background-removing technique. Background removal is essential for ecommerce business or showing product images that include flawed backgrounds.
Pro-Tip: No matter which background you want to apply, just make sure it’s just under the original layer.
Background Manipulation
Background manipulation is the process where image alteration is done. There are several reasons why people tend to choose image manipulation, such as image improvement or changing the subject of the image. Manipulation generally involves the pro techniques of changing what’s inside the image.
Pro-Tip: Preserve shadow, edges, and layers, and accurately apply to light; colors will lead you to better manipulation.
Background Extension
If you need to extend or stretch the background of an image to make the subject looks perfect, background extension is the perfect option for you. If you want to make your background perfect, background extension is your one-stop solution.
Pro-Tip: While extending the background, ensure Content-Aware is checked in the top menu.
Distraction/objects Removal
While capturing the photo, you could capture some unwanted objects, such as birds, trees, or any power. So, how can you remove these? You can easily edit it to remove unwanted objects. Use clone stamp or spot healing brush tool to remove any unwanted objects in images.
Pro-Tip: If you are a beginner, you can use the crop tool to cut the specific sections of the photo, and this way, the unwanted object removes easily.
Full Body Retouching
Full-body retouching is much more advanced than other photo editing tasks. As full-body retouching is the work of professionals, you need specialized hands to craft your images. Here are some of the retouching options that have been randomly used.
Face/body Reshaping
Altering or reshaping body size and proportion requires a professional’s attention. You need to form some techniques to get a better-transformed body. You may want to have increased height, nice legs, and a neck; all is ensured through the face or body reshaping.
Pro-Tip: In Photoshop, there are filters and edit features to have different shapes of your body.
Body Liquify
The liquify tool is one of the distinct Photoshop features for body and face editing. Liquify allows you to push, reflect, pucker, or rotate the area of the image. This feature lets you change the person’s body or face using the face-aware filter.
Pro-Tip: Liquify tool is only applied to any bitmap layer and can’t be practiced as a ‘smart object.’
Slimming
Manipulating your image for a slim body feature is a great way to shape your body in the image. Using liquify tool, you can achieve even more drastic ways to slim down your body in Photoshop. Easily manipulate your flabby body using the forward warp tool.
Pro-Tip: Use the Filter->Liquify option to find lots of the desired effects to transform your body, or use the Edit->free transform tool to edit the body feature.
Skin Smoothing & Toning
Skin smoothing and toning is a great way to enhance your portraits. Skin smoothing and toning include removing blemishes and smoothing the skin to look perfect or, simply, image retouching. Professional retouchers spend hours editing and perfecting their images.
Pro-Tip: Using the Blur tool in Photoshop, you can smooth your skin easily.
Cellulite Removal
Cellulite can be a problem if you have a flabby body. But to ease your issue, the dodge and burn option is there to hide and fix the stretch mark issue on your body. Cellulite is no more an issue when you have Photoshop and its assistance.
Pro-Tip: Use the dodge and burn tool in Photoshop to lighten or darken the cellulite area of your skin.
Color Correction
Color correction is one of the major steps for photo editing. The camera may have a great resolution to take photos, but it requires color correction most of the time. Professionals and models want to colorize their photos with precise color choice so it looks natural.
Pro-Tip: If you want to remove the color bounces or add tints to your image, use the Photo filter option in Photoshop.
Hair & Makeup Retouching
Hair-makeup retouching is one of the essential image editing stuff to enhance your look in photos. Models or professionals demand hair and makeup styles more or less for the photoshoot. Here are some of the hair and makeup retouching essentials and styles in photo editing.
Adding/enhancing makeup
In the beauty and fashion industry, enhancing makeup is one of the essential parts of photography. There are several makeup-enhancing tools in Photoshop, such as Dodging, burning, retouching lips, and enhancing eyeshadow and eyelashes for correct texture and color inconsistency.
Pro-Tip: Use custom brushes and shortcuts for faster editing.
Skin Smoothing/toning
Skin smoothing and toning are productive ways to enhance your portraits. Skin smoothing and toning include smoothing the skin to look flawless or, simply, image retouching. Expert retouchers spend hours editing and perfecting their images for skin smoothing.
Pro-Tip: Using the Blur tool in Photoshop, you can smooth your skin easily.
Blemishes Removal
Removing blemishes requires you to use the appropriate tool in Photoshop. Mostly, the clone stamp tool is used to remove blemishes on your skin. The processing shouldn’t be noticeable if the retouch work is done accurately. It provides an attractive subject look while increasing color accuracy.
Pro-Tip: Set the spacing (Brush Tip Shape) to 1% to make the edges smooth in the full-size brush panel.
Lengthening/darkening of Lashes
Lengthening or darkening eyelashes is an excellent way to enhance your look in images. The elongated lashes provide a realistic look when you want to shoot photos for modeling or the fashion industry. In Photoshop, there are several tools to edit your lashes.
Pro-Tip: Always create a new layer for lengthening or darkening of lashes for convenient editing.
Airbrushing
Airbrushing tool is the focal point here. This tool allows you to edit the light strokes, slight details, and blurry edges. So, this tool’s result is remarkable while reaching top photographic quality and a wonderful portrayal of Photoshop.
Pro-Tip: Set the opacity of the brush to 20 to 30%, and this makes the image more colorful.
Adding Fantasy/Special Makeup Effects
Adding fantasy or special makeup effects is a fun way to edit your photos. Special makeup is mostly used in beauty retouching and creative effects. In fashion photography, using CGI or computer-generated imagery has become more common these days. Photoshop generates special makeup or fantasy photos using lighting or magic effects and filters.
Pro-Tip: You can apply a magic effect on the subject using lens flare.
Frizzy Hair Removal
If you have curly hair and you want to hide it from the images, you can easily get rid of it through Photoshop. There are several ways you can edit and hide frizzy hair in Photoshop. The liquify and smudge tools can create magic with a small amount of Gaussian blur, removing your flyaway hair in a minute.
Pro-Tip: Before starting editing, ensure the layer mode is set to overlay or soft light.
Image Masking
The image masking process is one of the most used features of Photoshop. Image masking allows you to paint on a layer mask while you can hide or reveal parts of an image. It is essential to know the image masking for different kinds of adjustments or transformations.
Pro-Tip: For smooth edge transformation, pick a soft brush.
Color/light Adjustment
If you want to balance color adjustment and improve lighting, or you need lighting in a specific area of your images, there are some options you can consider. Light or color adjustments hold several types of adjustment types; here are some of the types mentioned in the following.
Saturation Correction
Saturation correction allows you to correct the specific area of colors and adjust and fine-tune the image with appropriate coloring. In Photoshop, you can easily adjust the saturation with your preferred color range and start editing right after opening the image.
Pro-Tip: While selecting saturation from the ‘Adjustment’ panel, keep in mind that it makes direct alterations to the image layer.
Adding/reducing warmth
When your camera work needs more enhanced editing options for adding or reducing lighting or warmth, Photoshop is the best option out there for editing. You can add or reduce warmth in several ways, such as curve adjustment layers, color balancing, and photo filter tools.
Pro-Tip: Use color blending mode to add warmth with no darkening effect.
Exposure Adjustment
Exposure adjustment is a very much crucial part of photo editing. When you want to adjust extra lighting, or you want to lighten the exposure, you can find the exposure setting in Photoshop. While you make changes to your photos through the exposure slider, it increases and reduces the coloring.
Pro-Tip: While editing, make sure you avoid clipping (shadows or highlights loss); this may cause the loss of detail.
Contrast Adjustment
The contrast adjustment sets the brightest part of your images. Contrast defines the brightness of light and dark areas of your images and also provides the shades of your image. You can easily adjust the brightness to increase the tonal values or decrease the values to expand shadows.
Pro-Tip: Press the letter ‘P’ from the keyboard for a quick toggle view of the brightness or contrast option.
Sharpening & Highlighting
Sharpening and highlighting is a bold process to edit your images. Sharpening provides clarity for your images, whereas highlighting defines your image’s specific/special area. There are lots of tools to sharpen your images in Photoshop.
Pro-Tip: Reducing the noise of the image provides sharper images.
Image Noise Reduction
Digital noise is the discoloration of a photo, and it degrades the quality of the photo. Image noise occurs as a result of low light scenarios, slow shutter speeds, or high sensitivity modes set in your camera. There are several processes by which you can reduce the noise of your images.
Pro-Tip: If you see color distortion, it’s color noise, and for black, white, or gray distortion, it’s luminance noise.
What Are the Most Used Photo Retouching Tools and Techniques?
The most used photo retouching tools and techniques are many. As most people use Photoshop to retouch images and the rising photo retouching services make photo editing tasks easier, there are loads of retouching tools and techniques out there.
Images play an essential role in the marketing and digital media section for smooth and shiny Photoshop retouching. These digital media sections can edit any kind of photo editing with their powerful tools and techniques. A graphic designer is more skilled at using these valuable tools.
Move to the next section for the retouching tools and techniques.
Tools to Retouch a Photo
There are many editing tools for digital photo retouching. Photoshop is the perfect tool for retouching and editing images. Many designers prefer Photoshop over any tools for perfect retouching work.
So, let’s find out the most used tools for retouching photos.
Perfect Skin Tool
Skin tone is one of the essential parts of a person’s appearance and also an important part of capturing images. Many online platforms provide skin perfection tools such as BeFunky, Skin Smoother, Fotor, and more. Photoshop is the most used tool for smoothing skin.
Wrinkle Remover
When you don’t want to see wrinkles or blemishes on your skin to make you look more attractive, wrinkle remover comes right on the spot. Many online platforms provide wrinkle-removing features, such as Fotor, iPiccy, piZap, BeFunky, and more. Professionals and designers use Photoshop for wrinkle removal.
Blemish Remover
If you want to remove imperfections on your photo, such as spots or blemishes on your face, there are blemish remover options to try out. Some of the online blemish removers are Fotor, Lunapic, piZap, BeFunky, and more. Photoshop does the job perfectly to remove blemishes from your photo.
Clone Tool
The clone tool is beneficial for duplicating objects or hiding any image defect. This effective tool is very much in use to hide the same colored area. Adobe Photoshop, Inkscape, GIMP, and Corel Photopaint has clone tool for editing.
Photo Reshaping
Photo reshaping defines how the pixel should be arranged. Photo reshaping or pixel reshaping is a very common task for ecommerce online image editing or website image submission. There are many online and offline photo editors out there that work as reshaping editors.
Digital Makeup
When you want to change the appearance of the subject through designs, clothing, or hairstyle, you apply digital makeup or edit makeup. Digital makeup helps influencers and cosmetics or makeup companies to advertise on social media. Some of the makeup editing websites are BeFunky, PicMonkey, and more.
Red-Eye Remover
If you have an eye issue or you need to remove red eye from your photo, there are more than enough online red-eye remover that provides prolific editing service for your red-eye issue. Also, Photoshop provides a red eye removing feature under the ‘spot healing brush tool.’
Techniques to Retouch a Photo
So, if you want to know some techniques this time, you are about to. Professionals frequently use these editing techniques for retouching. Here are some of the modern retouching techniques mentioned below.
Adjusting White Balance and Highlights
White balancing is undoubtedly an invaluable aspect of photography and is also one of the most accessible editing options to adjust in Photoshop. White balancing ensures you get the best lighting match with the photography, whereas highlighting defines your image’s specific/special area.
Pro-Tip: First, adjust the exposure, and later, use the white balance slider to get exquisite colors.
Make Skin Radiant
Making skin radiant in an image editor is one of the most used editing features. There are many online and offline editors to make your skin glow. Photoshop does it quite conveniently with the high pass filter option.
Pro-Tip: One of the easiest ways to glow your skin is using the high-pass filter in Photoshop.
Enhance Natural Beauty
While your camera may not capture the best shot for you, you need to edit the images later to enhance the image quality and bring out the natural beauty. Photoshop offers many options to reveal your face as a natural beauty with skin smoothing, glowing, and other options.
Pro-Tip: Use the filters, skin smoothening, sharpening, and color correction to balance your image color.
Sharpening and Detail Enhancement
Sharpening is a bold process to edit your images. Sharpening provides clarity for your images and shows a more detailed view of your images. There are lots of tools for sharpening your images in Photoshop.
Pro-Tip: Don’t over-sharpen the image. Balance the sharpening and details in the image.
Smoothing and Blurring Skin
Skin smoothing is a mellifluous way to enhance your portraits. Skin smoothing includes removing blemishes with a Gaussian blur effect and smoothing the skin to look perfect in Photoshop. Professional retouchers spend hours editing and perfecting their images with smoothing and blurring skin.
Pro-Tip: To create smooth brush strokes, set the smoothing amount to 10% to 45% for optimum performance.
Teeth Whitening
You want to the photo shoot, and your teeth require special treatment, but bleaching your teeth practically may get expensive. So, you can choose an editing option to whiten your teeth. Photoshop offers to whiten your teeth with a hue/saturation effect while using the lasso tool.
Pro-Tip: Notice the yellow saturation; this is the major factor for whitening your teeth.
Color Correcting and Colorizing
Color correction and colorizing images is an essential editing option. You may have some dark areas in your photos and want to edit and lighten the dark areas, or you need to colorize your photos. Many online and offline editors offer color correcting and colorizing, a very basic editing option.
Pro-Tip: Increase or decrease the color while holding the shift on the keyboard
What Are the Most Retouching Photos Types?
Professionals edit several types of photos, but there are different types of photo retouching that editors frequently use. Most of them are used in business, fashion, or modeling photography. Here are some of the trendy photo retouching types in the following.
- Portrait photo retouching
- High end photo retouching
- Fashion photo retouching
- Model photo retouching
- Product photo retouching
- Real estate photo retouching
- Wedding photo retouching
- Jewelry photo retouching
- Food photo retouching
- Furniture photo retouching
- Commercial photo retouching
FAQs
Why should you retouch your photos?
Retouching provides better visual effects; enhances the look and appearance of the photo by professionals while using various techniques.
How to retouch photos?
Use the spot healing tool, clone stamp tool, and patch tool in Photoshop, and use online photos editing websites such as BeFunky, GIMP, and Lunapic for easy retouching options.
How long does it take to retouch a photo?
Basic retouching takes 5 to 10 minutes, and professional retouching takes 30 to 1 hour to edit a photo.
How to outsource photo retouching services?
Research and find a capable company with a reasonable price point, arrange and define how your editing should be done, Send your bulk images, review their work, provide feedback if required, and receive your images.
What is the best photo retouching app?
The best photo retouching app is no doubt Adobe Photoshop, Lightroom, and other mentionable apps are snapseed, Pixlr, Picsart, and more.
What is the best photo retouching software?
Some of the best photo retouching software are Adobe Photoshop, GIMP, Pixlr, PicMonkey, Luminar and more.
What is the best tablet for photo retouching?
When you want to capture and edit photos at home, the suitable way to edit the images is to get a handy tablet. So, some of the editing convenience tablets are iPad Pro, iPad Air, Samsung Galaxy tab 7+, Amazon Fire HD10, and more.
How to retouch photos on an iphone?
Open your images in the Photos app and press edit to adjust angle, light, filter crop, and choose adjustment, brightness and saturation to provide accuracy and intensity.
How to learn photo retouching?
Practice is the best way to learn photo retouching, also, guide yourself to the professionals or follow their work on their website to learn their way of editing.
Perfection
Digital photography plays an important role in operating digital media and the e-commerce sector. So, the need for proper photo retouching and editing is of utmost necessity. Many sectors are evolving their business through perfect photo editing and retouching their images.
If you are a beginner in editing and require a professional photo editing service, let the professionals handle the editing tasks. Our guide defines the exact way how digital photo retouching works and its essentials.